One of the few tracks in the world still identical to its original configuration from the 1950s. Intimidating in real life, especially in the dangerous kink corner (see the Katherine Legge incident from 2006), it offers great online races to patient drivers. Remember: you do not have to be in front every corner, you just need to be ahead on the finish line. Risk it all every lap and you will cause crashes and frustrating races, wait for solid passing opportunities and you will have a lot of fun fighting back and forth.
iGPFun-F3 Laps: 23 ; 42+ liters
F3 Officials Laps: 13
Approximate laptime: 1m58s
Fuel consumption: ~1.75 liters per lap
Suggested downforce (F3): low to medium wings in the HDF configuration or MDF configuration, different choices work fine. Higher downforce, relatively speaking, is usually faster on single laps. However, you can choose low wings and top speed in the long straights to help you passing in the race. Track grip will also influence your choice.
Remember to adjust your gearing for drafting.
Demo Lap video at the end of the page
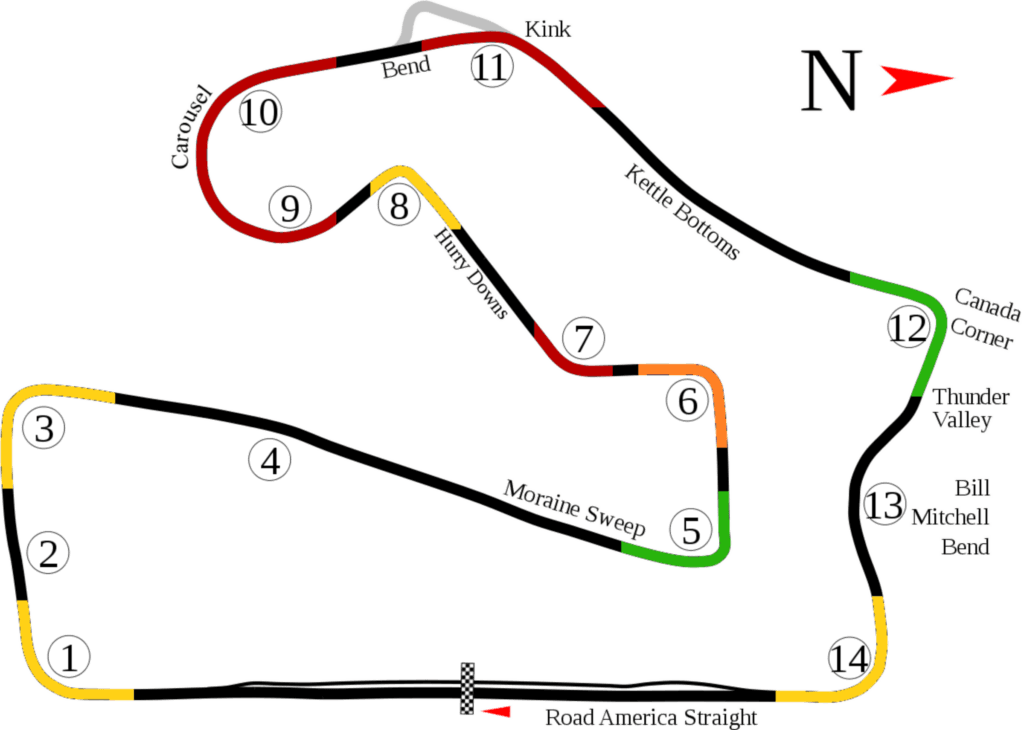
Passing zones are color coded in the image above.
Red: do not attack here, too dangerous or tactical suicide
Orange: attacking is risky and not recommended. Likely to have a crash or lose a lot of speed.
Yellow: you may attack here but there are better places, either due to danger of crashing or for tactical reasons
Green: good passing places
Road America offers plenty of overtaking chances. Be patient, do not force dangerous situations and you will most likely have a very enjoyable race.
Please remember that you will lose time by fighting other cars. It is often convenient to avoid side by side action. Plan your passes wisely and work with the other drivers when it is convenient to do so.
You will often have a draft down the long straights and so you will arrive faster in the braking zone; you will need to adjust your braking point for the added speed.
No dive bombing, as always. Do not attack unless you have a very clean chance. You will not need to wait long for other occasions.
Turn 1 Right
Fast corner with a very short braking zone at the end of a long straight where it is easy to get a draft.
Side by side is possible but difficult. The recommendation is to avoid it.
Attempt an overtake only if you are clearly ahead in the braking zone. Conversely, if you are being attacked it is better to let the other car go without forcing a side by side situation. You will have many chances to get your position back. Remember to leave room to your opponents if you have a car alongside you; this will require a lift.
Turn 3 Right
This is not a passing zone for tactical reasons.
If you attack here you will lose a lot of speed, which will cost you dearly in the very long following straight. The best tactic, by far, is to concentrate on getting a good exit and then attacking on the straight leading to turn 5.
Turn 5 Left
One of the best and safest passing zones.
Just pay attention to the usual dangers: no dive bombing, leave room to your opponent, do not drift wide on exit.
When in a draft, you will arrive much faster in the braking zone; adjust your braking accordingly. And if approaching the corner on the inside you will need to slow down more than usual.
Please remember that voluntarily driving off track (1x) is against the rules and protestable.
It is not uncommon to get into 3-wide situations on the preceding straight. The recommendation is to avoid doing it if at all possible, especially in the early race.
Turn 6 Left and 7 Right
No passing here. It is dangerous and doesn’t achieve anything.
Turn 6 is slow but narrow and difficult. You are going over a blind crest and cars are pushed wide on exit. No point attacking, really. At best you will lose a lot of time. At worst you will have a crash.
Turn 7 is fast and flat out but just as narrow. Trying to squeeze two cars through here is pointless and will just slow them both down a lot.
Turn 8 Left – Hurry down
This looks like a passing spot but it rarely is. Difficult corner that loves to bring you on the dirt and spin you around, rather narrow line, downhill braking. There are much better and easier passing spots on the track; use those if you can.
Turn 9-10 Right – Carousel
No passing here as well. The Carousel is a nice corner where good driving can make a difference; get a good exit and you will easily set up a pass on the following straight. Side by side here is, instead, rather pointless.
Drivers can take different lines on corner entry; be aware of this and don’t try to dive into a gap that will soon close.
Turn 11 Right – The Kink
This corner is scary in real life. If Katherine Legge’s accident above is not enough for you, have a look at this crash (video) and take note of the commentator “that’s not a place to make a pass, even if it was a slower car” to get an idea of what can happen. We don’t risk injury in virtual racing but you should still respect the kink. No side by side action, ever, and be careful not to drop a wheel on the grass.
Turn 12 Right – Canada corner
One of the best and safest passing zones.
You don’t have to attack at the Carousel or Kink because you can do it much more simply here. Get a nice exit, exploit the draft on the long straight and pass under braking. Both inside and outside attacks can work, since the following corner is on the left.
Just pay attention to the usual dangers: no dive bombing, leave room to your opponent, do not drift wide on exit. When in a draft you will arrive faster in the braking zone; adjust your braking accordingly. If approaching the corner on the inside you will need to slow down more than usual.
Not much room for 3-wide here. Best to avoid it in most circumstances.
Turn 13 Left
Narrow line through a fast corner that can be surprisingly tricky with some low downforce setups.
Side by side here should be avoided.
Turn 14 Right
Normally not a passing zone for tactical reasons; side by side will slow you down and you will pay dearly in the following, uphill straight. As usual, concentrate on getting a good exit and use the draft to pass safely on the start/finish straight.
However, this is the final corner of the race in the last lap. You have two choices: pass in the corner; get a good exit and overtake on the straight just before the finish line. Both options can work.
F3 Demo Lap, 2020 Season 4 – First session on track, plenty to gain. Left 2 tenths at Canada corner, for instance
Nigel Mansell lap, listen to the commentator at the very end of the video