One of the British tracks built upon airfields just after world war 2, and thus completely flat, it has been a staple of British racing ever since.
Real life F3 on board and race videos are linked at the end of the page.
Snetterton is not famous in iRacing but you should certainly give it a try. It has some corners unique in iRacing, like the long right hander leading into a tight left or the very fast left hander getting into a very tight and slow 2nd gear right.
The track is difficult to learn but if you put the will and effort you will be rewarded with a very satisfying drive, especially in the F3 car.
iGPFun-F3 Laps: 28 ; 41+ liters
F3 Officials Laps: 15
Approximate laptime: 1m38s
Fuel consumption: 1.4 liters per lap
Suggested downforce (F3): Very high; you may want to consider using the Gurney flap
You will have to brake while turning, careful not to use too much rearward brake bias
Passing zones are color coded in the image above.
Red: do not attack here, too dangerous or tactical suicide
Orange: attacking is risky and not recommended. Likely to have a crash or lose a lot of speed.
Yellow: you may attack here but there are better places, either due to danger of crashing or for tactical reasons
Green: good passing places
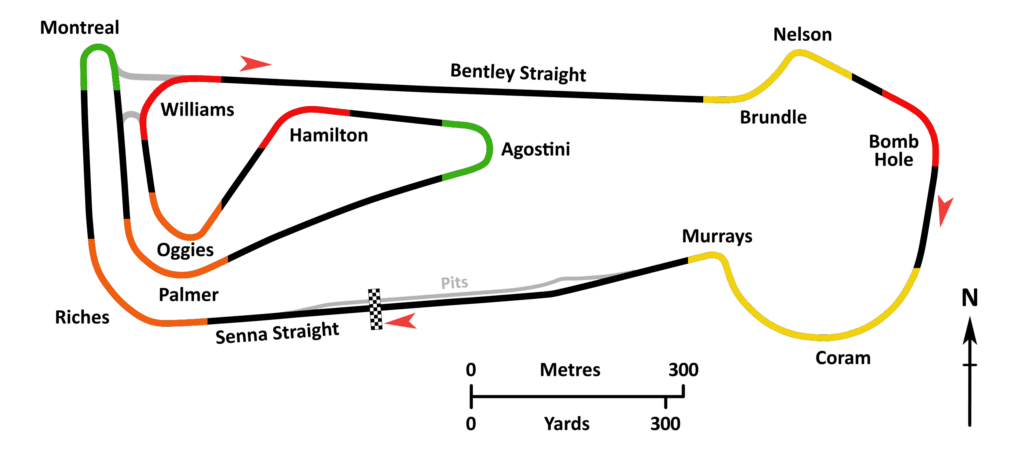
Turn 1 Right – Riches
Very fast corner, almost flat out. Side by side possible if both drivers have good car control and leave space.
Completing a pass here is difficult at best, but you can use this corner to set up a pass in turn 2. The trick is to get a much better exit speed than the car in front.
Turn 2 Right – Montreal
One of the best and safest passing zones.
Main issue is the short straight leading up to the braking zone. Passing on the inside is generally easier, but an outside pass may work since you will have the inside in the following corner.
Just avoid dive bombs
Turn 3 Left – Palmer
Rather narrow line in a fast corner. No real point trying to pass here, much better to wait for …
Turn 4 Left – Agostini
Probably the safest passing place. Sufficiently long straight, hard braking into a slow and quite wide corner.
Avoid dive bombing and remember to leave sufficient racing space for your opponent when you are tracking out.
Turn 5 Left – Hamilton
Short and narrow corner, flat out at high speed, soon leading into a tricky braking zone.
This is a place where you should never attempt a pass in normal racing conditions
Turn 6 Right – Oggies
Short braking, difficult corner, not a lot of room to be side by side. Much better not to think about passing here
Turn 7 Right – Williams
Another no passing zone, you would just lose a ton of speed for no reason.
Try to get a good exit speed to attack on the long Bentley straight with the help of a draft
Turn 8 Left and 9 Right – Brundle and Nelson
Attractive passing zone thanks to the long straight. The tricky Nelson corner makes things hairy. Braking while turning into a slow speed, tight corner with a very narrow line.
If you can get ahead on the straight it is then possible to pass here. A late attempt from further back will almost always result in a crash.
If you are defending, consider giving up and fight another day if your opponent managed to get alongside you in the braking zone.
Turn 10 Right – Bombhole
Fast, narrow, short. No passing here under normal conditions
Turn 11 Right and 12 Left – Coram and Murrays
Same idea as Nelson. You have to brake into a slow, narrow left hander while you are still turning for one of the longest corners in iRacing. Side by side is possible but requires cooperation by all drivers. Consider attacking here only if you really cannot do it elsewhere, perhaps because it is the last corner of the race.
A quick demo lap by Lucas Maruk and a few videos from the real F3, on board and races