Bathurst, Mount Panorama is a challenging track to drive and even more so to race on. The suggestion is to find your own rhythm rather than worrying too much about what the others are doing. Attrition is usually high and just going safely to the end will reap you rewards.
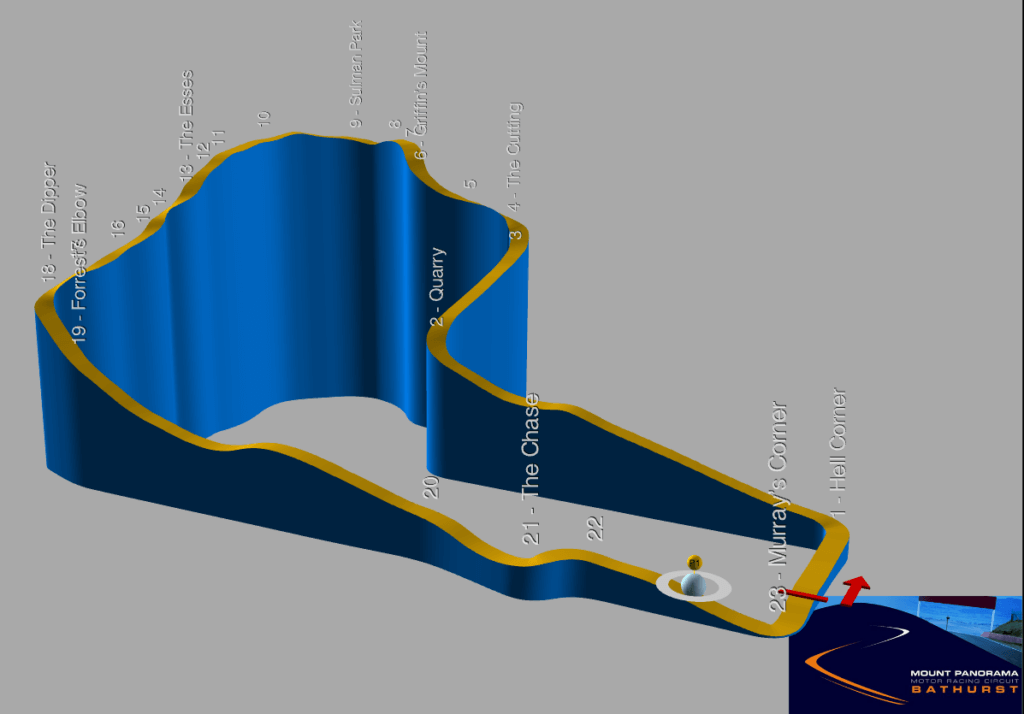
You spend half the lap going up and down a 174 meters, steep, narrow mountain road with walls on the track edge that ask for high downforce; just have a look at the elevation map below. The other half, however, is long flat-out straights where low wings are king. Setup needs to compromise even more than usual.
Racing-wise you have to be extra patient on the mountain section. No passing and no loss of control, otherwise you will block the track and cause a multi-car pile up.
iGPFun-F3 Laps: 24, 149.0 km
F3 Officials Laps: 13, 80.7 km (15 in 22S1)
Approximate laptime: 1m58s
Fuel consumption: 1.6 liters per lap
Suggested downforce (F3): Different choices can work. Low wings to be fast on the straights can be ok, but you must be sure to survive the mountain comfortably. Many drivers pick up a low wings setup from others but then fly off-track in the mountain, often in the usually flat-out left hander near the top.
Pick a setup that brings you to race end without drama; consistency is much more important than raw speed in general and especially here at Bathurst
Demo Lap video at the end of the page
History of the track at this page; official track page here.
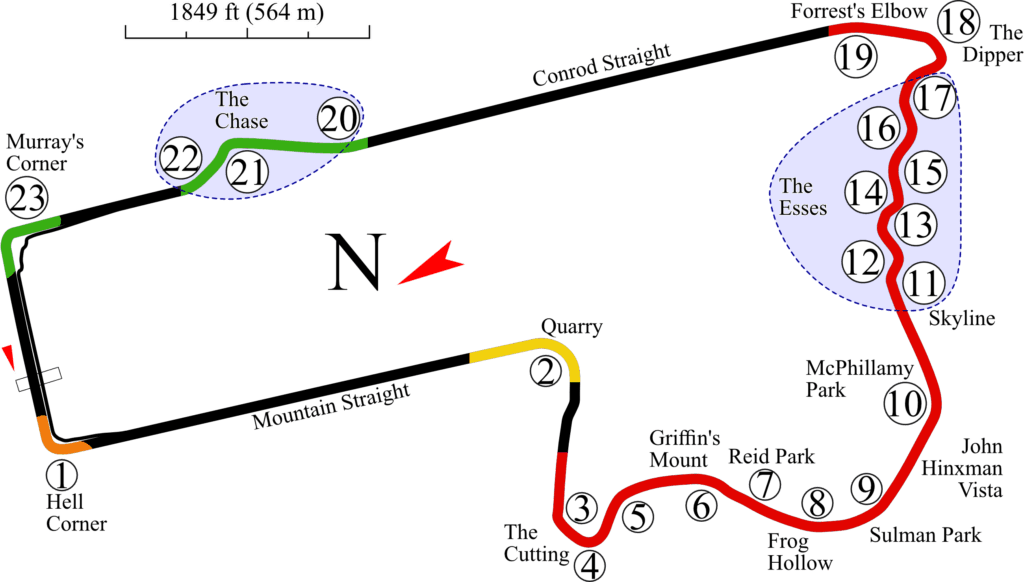
Passing zones are color coded in the image above.
Red: do not attack here, too dangerous or tactical suicide
Orange: attacking is risky and not recommended. Likely to have a crash or lose a lot of speed.
Yellow: you may attack here but there are better places, either due to danger of crashing or for tactical reasons
Green: good passing places
Mount Panorama Bathurst can be intimidating, but treat it with the respect it deserves and you will enjoy a thrilling and satisfying ride.
It is easy to end up 3 wide on the two long straights, leading into turn 2 and turn 20. Avoid risks and be ready to give room, even if it means losing a position. You will soon have other chances to pass.
Turn 1 Left – Hell Corner
Orange not because of the danger but for tactical reasons. Go side by side or even just compromise your entry/exit and you will lose a lot of speed for the long Mountain Straight. Attacking here is almost never a good idea. Much better to concentrate on getting a good exit to pass cleanly and efficiently on the following straight.
The name (Hell) apparently derives from the presence of a tree stump outside the corner. Bike riders crashing here would hit it and go straight to hell.
Turn 2 Right – Quarry
Short braking and a corner that loves to bring you wide. Passing is possible but be careful, there are many incidents here. Only attempt to pass if you are fully alongside well before the braking zone.
Conversely, consider if you really want to defend hard here. Letting someone through and set up for a pass after the mountain section might be the best and quickest option.
Turn 3 to 18, Mountain Section
This is narrow, twisty and with concrete walls just inches from the racing line.
No attacking here, it is just too dangerous.
It is important to play it safe, even more so in the early race. There are no escape routes and a car crashing at the front of the field will cause colossal pile ups.
You don’t even need to follow other cars too closely. Just concentrate on getting a good exit from 18 and exploit the tow in the long downhill straight.
Turn 20-21-22, The Chase
One of the best passing spots, but you still need to be careful due to the short braking into a fast corner entry.
Get a draft on the Conrod straight and complete the pass under braking for the Chase. Cars can go side by side through this section, just be ready to give room to your competitors: it will be more fun for everyone.
As always, remember that you do not have to attack/defend every single corner. Just go for safe passes and defend only when it is really worthy, this is the fastest way to race and you will soon have another chance on this track… unless it is the last lap of course.
Turn 23 Left, Murray’s Corner
Usually not a passing place because side by side here will cost a lot of time. Tactically it is usually better to wait and attack after Turn 1 left. However, the corner is not dangerous and passing is possible, and if it is the last lap of the race …
F3 Demo Lap – 2020 Season 4