Ride height is important, simple in its effects and yet often misunderstood.
It is the distance between the bottom of the car and the ground, measured at the front and rear.
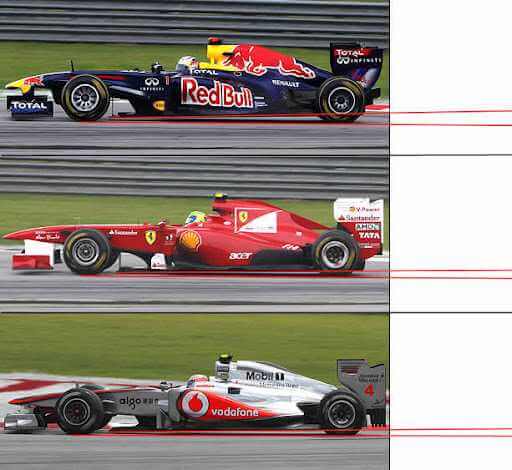
If the rear is taller (more distant from the ground) there is said to be a positive rake.
If the front is taller there is negative rake, which is seldom if ever used real life (F3).
Higher positive rake increases the downforce of the car (up to a point), which gives more grip in corners but also more drag resistance (resulting in lower speeds) on the straights.
See image at the end of the page for real life rake examples.
How Ride Height affects your Handling
First of all, ride height and rake have a profound effect on aerodynamic efficiency, speed and grip.
Dallara recommends to set the car as low as possible (see below), but we have no information on what rake is theoretically ideal. If you do testing to find this out, please let us know the results.
Some real life F3 manuals suggest to start with 20mm rake, but we do not know if it is static or else.
More rake leads to more oversteer; less rake is conductive to understeer.
You can use ride height to quickly alter the car balance if you want to tune an otherwise good setup. More on this below.
Static and Dynamic Ride Height
The values you can read in the garage (more below) refer to the car sitting still in the pits; this is referred to as static ride height.
On track, things change into something called dynamic ride height.
Imagine the front of the car going over a bump; it will be closer to the track than when it is sitting still in the garage – the ride height will be lower while the car is on the bump (ignoring suspensions for simplicity).
Now think about braking hard into a corner. The weight will shift to the front and will push the car closer to the ground (smaller ride height), while the rear raises (higher ride height). This gives more positive rake, reflected in more oversteer.
Incidentally, this pitching movement can negatively affect the car balance. Suspensions settings, including the 3rd/heave springs, can/should be used to counteract it.
Finally, picture the F3 travelling at speed down a straight. The downforce from the wings will push it down, lowering the ride height (see thread setup for dummies on wings). Chances are that the rear will be pushed down more than the front, since the rear wing is usually larger. Since downforce (weight) is higher at higher speed, one might want/need to use stiffer suspensions on the straight (to avoid bottoming out) and softer in corners (for grip). We do not have active suspensions, but the heave spring can help on the matter… but this is more advanced than intended here.
In short, the distance between car and track changes all the time when the car is in motion. The balance of the car changes, possibly quite a bit, with changing rake. Limiting the car movement with stiffer suspensions will help limiting the rake changes, giving a more predictable car. Stiffer suspensions, however, tend to result in less mechanical grip. Compromise, as always, in set ups.
Unfortunately, such dynamic ride height can only be measured through telemetry analysis.
Which values should I use?
The car weight, including fuel and wings, pushes it towards the ground. The suspensions and tyres (including geometry) keep it off the ground. It follows that ride height should be set after you have found the desired suspension, wings, tyres and fuel settings.
First of all, the car should be tall enough that it does not touch the track. You can judge this from telemetry, of course, but also visually in a replay. You should also hear a sound when driving if you scratch the track.
Apart from that, Dallara recommends to set the car as low as possible. Only one thing to be careful about: tune the ride height to the suspensions and not the suspensions to the ride height. In other words: do not make the car more rigid only to keep it off the ground. Use suspensions as soft as you would like and adjust ride height from there.
“As low as possible” refers to the front ride height. Then adjust the rear ride height to obtain the desired rake.
Up to you to decide if you want to depart from the real life recommendations.
How do you change ride height? Garage
You can find the ride height in the garage settings on the chassis page.
There are two values at the front, left and right, and one for the rear. Front values are around 15-20mm, as a reference. These values cannot be altered directly but they reflect changes from other setup components.
Altering the pushrod length offset (front and rear) is the recommended way to alter ride height according to the Dallara manual and conversation with real life F1 race engineers. When moving from qualify to race fuel, I typically need to raise front and rear pushrod by one click.
Altering other setup parameters will also affect the ride height. Suspension stiffness, tyre pressure, camber, toe, etc. will all affect the ride height. As written above, find your set first, and tune the ride height to it afterward.
Do I really need to use telemetry? Altering car balance with ride height
Only dynamic ride height matters and this can only be measured through telemetry analysis. Ideally you would always check telemetry. However, if you, like me, are too lazy to do it you can get away with much less effort.
- Start with something you like/works in another set, for instance the iRacing baseline, and take note of the static rake (difference between front and rear ride height).
- Drop the static front ride height as close as possible to 15mm without failing tech because the car is too low.
- Set the rear ride height to obtain the same rake as your reference setup.
Go out on track. If the car scratches the ground, bottoms out on a curb or whatever, come back to the pits, raise the front and adjust the rear to the desired rake.
If you would like a little more oversteer but do not want to alter any other setup parameter, increase the positive rake by raising the rear. If you would like more understeer, decrease the rear height.
This rough approach will work most of the time. You can have some problems if you move from very high downforce (lots of weight on the car) to very low downforce (little weight) or if you change from very stiff to very soft suspensions, but otherwise you will most likely be fine (but possibly not perfect).
With few exceptions, I personally use as close as possible to 15mm ride height in the front and about 10-20mm more at the rear (2020S4). Variations on the theme exist.
Aero Calculator
Knowing the dynamic ride height (through telemetry), the garage has an interesting feature to help you understand your car.
The values “front and rear RH [ride height] at speed” do not alter the setup, they are just a calculator to help you judge changes in your car. Changing them you will notice that the values “downforce to drag” and “aero balance” change, as well.
Downforce to drag
The higher the better; it indicates how much downforce (good thing) is generated in relation to the amount of drag (bad thing).
Play with the numbers and see what happens. For example: set the Front RH at speed to 1mm; cycle the rear RH between 1 and 40mm. Notice that the downforce to drag remains around 3.7
Now try raising the front RH. You will see that as values become smaller, you are generating less downforce for the same amount of drag.
As written above, Dallara recommends to keep the car as low as possible…
Aero Balance
Rake has an impact on the total downforce and on how forward/rearward it is. The more positive rake, the more forward. The “aero balance” number let’s you assess the impact of a constantly changing rake on the car.
For example, set the front RH to 5mm and rear RH at 25mm in the garage calculator. You will see an aero balance of 45%, meaning that 45% of the total downforce generated is at the front. Now change the rear RH to 15mm; the aero balance becomes 43.4%. Your car balance has shifted (towards understeer).
Imagine a high speed corner where the wings push the rear RH to 15 and another corner, slower, where it stays at 25mm. You car will have a different balance in different corners.
If your car is not working as you would expect in specific corners, have a look at the rake/aero balance over a whole lap and try to decide if you want to keep it more under control (usually with suspensions).
Real Life Example: F1 Cars
Red lines provide a visual clue about rake in real F1 cars. Unknown source from the net, apologies for lack of credit