If you follow motorbike racing you will be very familiar with this Australian track, less so if you are only a 4-wheels fine. Do not let this put you off. Phillip Island is very nice to drive and even better to race on. It has a bit of everything: a couple of long straight with a significant draft; heavy braking into a slow hairpin for overtaking; difficult high speed corners going over a crest and a left-hander that will test your driving line.
Click here to open the track page
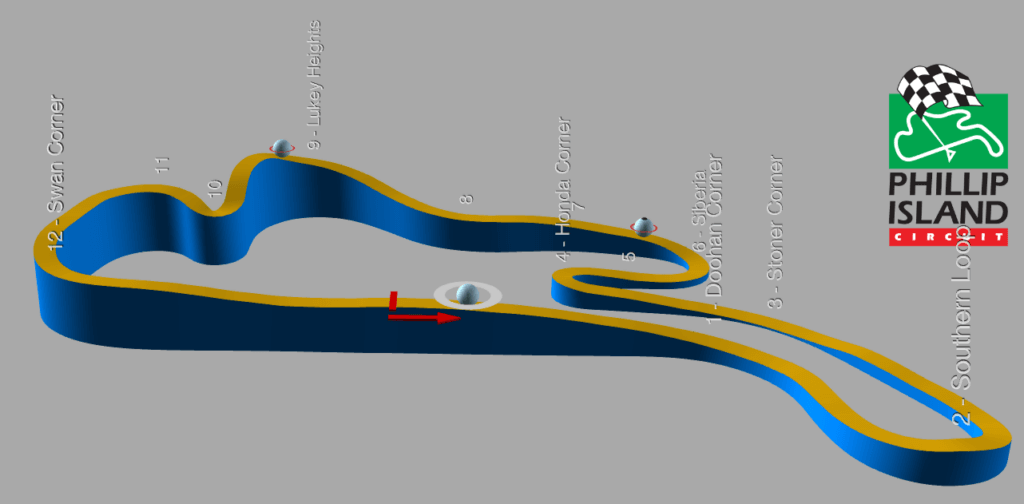
Track length: 4.44 km, 12 corners
Approximate laptime: 1m22s (F3)
iGPFun-F3 Laps: 34 ; 151.0 km 44+ liters
F3 Officials Laps: 18 ; 79.8 km
Fuel consumption: ~1.25 liters per lap
Suggested downforce (F3): Phillip Island is a fast track. People tend to use relatively little wings, usually in the downforce configuration. If you have troubles making it safely through turn 9 left, Lukey Heights, you probably need to add downforce. Higher wings will help you get a better exit from the Southern Loop (Turn 2 left) and set up a pass into the hairpin; lower wings will help you pass on the start/finish straight.
Demo Lap video at the end of the page
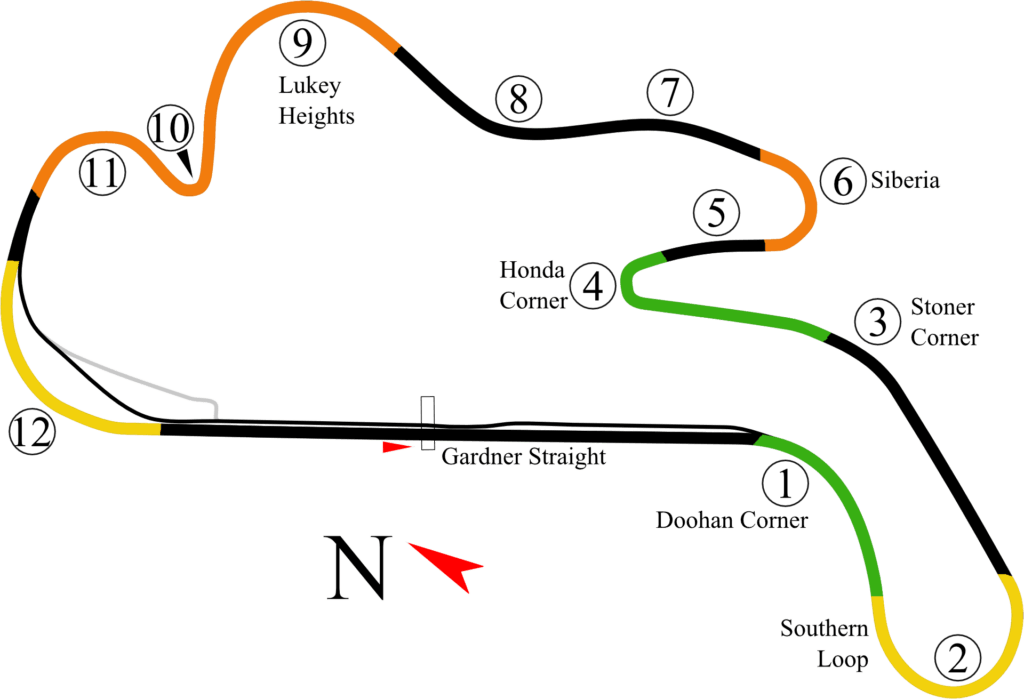
Passing zones are color coded in the image above.
Red: do not attack here, too dangerous or tactical suicide
Orange: attacking is risky and not recommended. Likely to have a crash or lose a lot of speed.
Yellow: you may attack here but there are better places, either due to danger of crashing or for tactical reasons
Green: good passing places
Pit Exit
Note: the longer pit exit is safer and should be used. It will let you join the track on the outside of Turn 1 with a full view of cars coming up to you. On the contrary, the short pit exit is blind and puts you right in the middle of the racing line with cars at very high speed.
Turn 1 Right (Doohan) and Turn 2 Left (Southern Loop)
Turn 2 is difficult; braking is short and side by side requires very good car control by both drivers. On top of this, its exit leads to the safest passing spot on the track, the Honda hairpin. The recommendation is not to attack here, but rather concentrate on the exit.
However, the start/finish straight offers easy passing opportunities thanks to the draft. You have a chance to be clearly ahead of your opponent going into turn 1. This situation offers a safe pass, which terminates before the tricky turn 2 if the opponent is smart and decides to let go and fight later instead of contesting the corner.
Evaluate the risk/reward carefully and do not be afraid to lay back. As always, you do not have to be ahead in every single corner, just at the checkered flag.
Turn 4 Right (Honda Hairpin/Corner)
Best passing spot on the track. Get a tow on the long straight (turn 3 left is an easy flat out) and pass under braking. Just avoid dive bombs.
Turn 6 Left (Siberia)
Difficult corner; narrow line that brings you wide. Side by side costs a lot of time and often results in contact. No passing should be initiated here under normal racing. However, passes initiated at the hairpin might be concluded here. Giving up is often faster than contesting this corner.
Turn 9 Left (Lukey Height), Turn 10 Right and Turn 11 Left
No passing here under normal conditions. Turn 9 brings you over a crest with a very fast left-hander. Side by side is difficult. Then you are thrown downhill into a short but hard braking zone for the Turn 10 Right hairpin. There is not enough time to get alongside and pass your opponent before this very tight right hander. Not enough space to pass on the following Turn 11, either. Side by side here will often see a car spinning off-track.
Turn 12 Left
Flat out, wide, corner, side by side can be easily achieved here. Tactically it is usually better to stay behind your opponent and pass on the straight with a draft. However, in special situations like the last lap of the race, you may want to start attacking in the corner.
F3 Demo Lap – 2020 Season 1